Build an animated Loading widget with Flare and Flutter
Detailing my journey stepping into design and animation with Flare, drawing and animating a Loading widget and using it in a Flutter app.
Inspiration
A week ago I posted an animated Switch widget on my Instagram, built with Flare and Flutter.
I got inspired by a fellow follower to use Flare to build a animated Loading widget. So, challenge accepted, and I proceeded to spend a weekend to build the said animated Loading widget, not without references from other public Flare files.
Here’s what we’re building, a Loading widget with a looping wave. The height of the wave will be increased depending on the actual “loading calculation”.

Flare by 2Dimensions
If you haven’t heard about Flare, it’s a design and animation tool run entirely on your web browser, and it’s free for public files! It also comes with a platform to share designs and animations, with the concept of forking, just like GitHub. More importantly, it’s super easy to bring the animation into Flutter, which we’ll see along this post.
The Loading widget
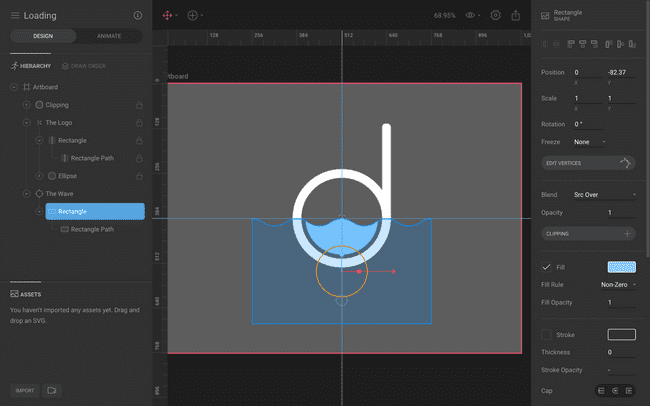
The Loading widget is pretty simple, a simple Logo built with combination of an eclipse and a rounded rectangle, and the wave. I’ve set the wave to be a child of a node so that we can manipulate it in Flutter later on.

If you’re interested to the see process of the drawing, I’ve recorded a 30 minutes video from drawing on Flare to deploying on Flutter below.
Once you’ve done the drawing and animation, simply export it as the binary format and it’s time for Flutter!
Here’s a link to the Flare project.
Import the animation into Flutter
Importing the animation into Flutter is the same as importing any other assets such as images. Just create an assets folder and dump the .flr file into it.
Inside pubspec.yaml, add the following line under flutter:
  assets:
    - assets/Loading.flr
Then add the flare_flutter package under dependencies:
flare_flutter: ^1.5.5And we’re ready to go! The code is pretty short, at 60 LOC. Let me just dump it here 😈
import 'dart:math';
import 'dart:ui';
import 'package:flare_flutter/flare.dart';
import 'package:flare_flutter/flare_actor.dart';
import 'package:flare_flutter/flare_controls.dart';
import 'package:flutter/material.dart';
void main() => runApp(MaterialApp(home: Loading()));
class Loading extends StatefulWidget {
_LoadingState createState() => _LoadingState();
}
class _LoadingState extends State<Loading> {
LoadingController _controller = LoadingController();
Widget build(BuildContext context) {
return Scaffold(
floatingActionButton: FloatingActionButton(
onPressed: () => setState(() => _controller.increment()),
child: Icon(Icons.add),
),
backgroundColor: Colors.blueGrey,
body: Container(
child: Center(
child: FlareActor(
'assets/Loading.flr',
animation: 'Idle',
controller: _controller,
),
),
),
);
}
}
class LoadingController extends FlareControls {
double _targetY;
ActorNode _wave;
void initialize(FlutterActorArtboard artboard) {
super.initialize(artboard);
_wave = artboard.getNode('The Wave');
_targetY = _wave.y;
play('idle');
}
bool advance(FlutterActorArtboard artboard, double elapsed) {
super.advance(artboard, elapsed);
_wave.y = lerpDouble(_wave.y, _targetY, min(1.0, elapsed * 5.0));
return true;
}
increment() {
_targetY -= 50.0;
}
}Let’s zoom in the important bits.
Show animation with FlareActor
First thing first, we load the Flare animation with FlareActor, show it where to get the .flr file, which animation to run, and set the controller.
FlareActor(
  'assets/Loading.flr',
  animation: 'Idle',
  controller: _controller,
),
If you omit the controller bit, you basically have a simple animated Loading widet. But we’d like to go one step further by being able to control the wave’s height, to fill up the space.
Control nodes with LoadingController
We create a LoadingController which extends FlareControls which implements FlareController.
That’s a mouthful.
Basically, FlareController defines an interface to customize the behavior of a Flare animation at runtime. With this, we can control the wave’s height (actually its position) while running the idle animation. There are many other examples on flare_flutter repo showcasing the capability of FlareController
FlareControls is a basic implementation of FlareController which has already defined all the basic functionality, such as playing an animation, advancing every frame and mixing animations. By extending FlareControls, we can concern ourselves with the positioning of the wave.
With that explained, is pretty simple to move the wave’s position. First, we get a reference to the wave in the initialize method.
void initialize(FlutterActorArtboard artboard) {
super.initialize(artboard);
_wave = artboard.getNode('The Wave');
_targetY = _wave.y;
play('idle');
}Then, on every frame, we set the wave’s Y position using a simple lerp (linear interpolation) method to smoothen the transition.
bool advance(FlutterActorArtboard artboard, double elapsed) {
super.advance(artboard, elapsed);
_wave.y = lerpDouble(_wave.y, _targetY, min(1.0, elapsed * 5.0));
return true;
}That’s it, now to move the wave, we just need to set _targetY to another different number and it will smoothly transition to it.
Here’s the result and a time-lapse of the work.
If you find this helpful, leave a comment below to let me know. Or follow my Instagram account. Or buy me a coffee at Patreon.